By utilizing run.events with the Epson ColorWorks CW 3500 badge printer and Expo Badge fan-fold paper, event organizers can eliminate dependency on external badge printing providers, thereby reducing their costs by thousands of Euros, Dollars, or Pounds.
The Epson CW 3500 printer is extremely popular for conference badge printing because it offers quick, on-demand badge printing, essential for managing large volumes of attendees efficiently. Its compatibility with specialized fan-fold paper sizes such as 96.5 x 134 mm (3.8” x 5.3”) Expo Badge simplifies the badge issuance process with one-step printing and folding.
The 96.5 x 134 mm (3.8” x 5.3”) badge size is optimal for displaying all necessary attendee information clearly without being overly bulky. This paper size is produced by various manufacturers in Europe and the USA, including smart2b, Nakagawa, and many others.
The reliability of the Epson CW 3500 printer, along with the professional-looking and easy-to-print Expo Badges, make it a hassle-free solution, reducing the likelihood of technical issues during events.
run.events is fully compatible with the Epson CW 3500 printer and all its common label sizes, including the Expo Badge 96.5 x 134 mm (3.8” x 5.3”) fan-fold paper, offering a seamless experience for conference organizers.
This compatibility eliminates the need for any additional software, streamlining the entire badge printing process. There's no need to export data from run.events to any costly external systems, as the platform directly communicates with the printer for on-the-fly badge creation.
This all-in-one solution makes run.events the preferred choice for organizers seeking a professional, efficient, and hassle-free badge printing setup.
Setting up the Hardware
When you first purchase the Epson CW 3500 printer, it comes with a roll of sticker labels. You will want to replace these with Expo Badge fan-fold labels. The loading of these labels into the Epson CW 3500 is nicely explained in the following YouTube video:
https://youtu.be/Qbvw8KDvyFA
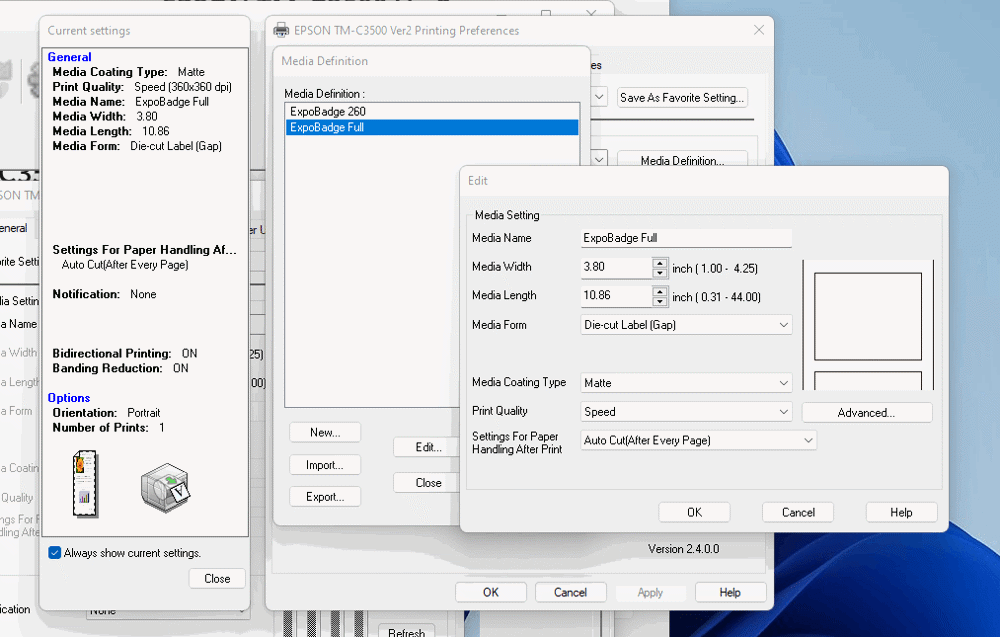
Setting the Paper Size
Since the Expo Badge 96.5 x 134 mm labels are fan-fold, meaning they need to be folded and stuck together after printing, the Epson CW 3500 printer considers the full, double size as the paper size, including the cut-out margins. The destination paper size you need to set is 3.80” x 10.86”.
Designing Your 96.5 x 134 mm (3.8” x 5.3”) Expo Badges in run.events
If you choose to use run.events with the Epson ColorWorks CW 3500 and Expo Badge fan-fold paper, you can start with either a blank badge design or one of the three pre-designed templates currently offered within run.events.
Whichever route you take, please ensure that you select both the "Two-sided printing" and "Fan-fold second page" options. Then you can design both the front and back sides of your badge.
Printing 96.5 x 134 mm (3.8” x 5.3”) Expo Badges Directly from run.events
Once you have designed your expo badges in run.events, you can print them the same way you would print any other badges from the platform. Go to either the "Tickets" or "Registration Desk" screens, select the tickets you want to print, choose your newly created badge design, and click the print button.
Conclusion
And voilà, you have just printed professionally-looking event badges directly from run.events without the need for any external service providers. You have saved time, money, and increased your data security by avoiding any data export and not handing over attendee data to third-party service providers